Saturday, October 30, 2010

Matcha Rare Cheesecake: A slice of Japanese taste from your kitchen!

For me Japanese green tea powder (or Matcha 抹茶 ) is the love affair ^^, it began a long time ago. From the moment that I read about it in the manga, I really want to know how it taste like. I always search for it everywhere I go, but at that time it's really hard to find.
Now it's easier to find and many of good quality can be purchased (with a lot of money >*<) and my love for the green tea still grow. 
You can see sweets from green tea almost everywhere, it is very common, but for making it by yourself the first thing is find the one that you like. As other kinds of the ingredient, I suggest you choose the one that you love the taste of it, you can dip your finger into the powder and taste it, if you love it in its powder form, your sweet will taste great for you too.


For me after I got green tea powder from my friend I always want to use it (if you can get the one that you like you will be the same ^^, the fragrance is great, the bitterness is balance and it's delicious). So when I see the book:  ..................... I just had to buy it.
There are a lot to choose from, cakes, ice cream, macaron etc. anyway I had to choose only one to make (actually I really want to make all of them but I can't eat them all at the same time).
I choose the Matcha Rare cheesecake for 2 reasons, 1.I love cheesecake  and 2. I think green tea will make cheesecake taste less rich which mean I can eat it more, haha. You can make it in 1 15cm square pan or use a mini cheesecake pan like me. 
For the sweeten kidney bean, if you can buy it it will be easier but you can do it by yourself too just follow this recipe. Even you skip it ^^, the cake still delicious. So, if you have some of the green tea powder at home (or you may want to go out and get one box of it, haha), follow me into the kitchen and we can have a slice of delicious cheesecake together. 


Matcha Rare Cheesecake
(Japanese Green tea powder cheesecake)
Makes 15x15cm cake or 9 mini cheesecake 


50g .................................. Butter (soft)
80g .................................. Graham crackers
.......................................... A pinch of salt
70g .................................. Sugar
5g .................................... Gelatin
2tsp ................................ Matcha (Japanese Green tea powder)
150ml ............................ Whipping cream
200g .............................. Cream cheese
100g ............................... Sour cream
20-27 ............................. Sweeten boiled kidney bean (plus more for decorating)
......................................... Dark chocolate for decorating


Crush the cracker with the rolling pin.
 In a medium bowl, stir together the graham cracker crumbs, salt and butter until blended. 
Divide the mixture among the mini cheesecake tin and, using your fingers, pat it into an even layer in the bottom of each cup. (If using 15x15cm pan with removable bottom just pat the entire cracker into the bottom of the pan).
Refrigerate for 30 minutes, until firm.


Bloom the gelatin in cold water for 3-5 minutes.
Put the gelatin in the microwavable small bowl with 1tbsp of water, heat in the microwave for 20seconds, stir to melt the gelatin, set aside.


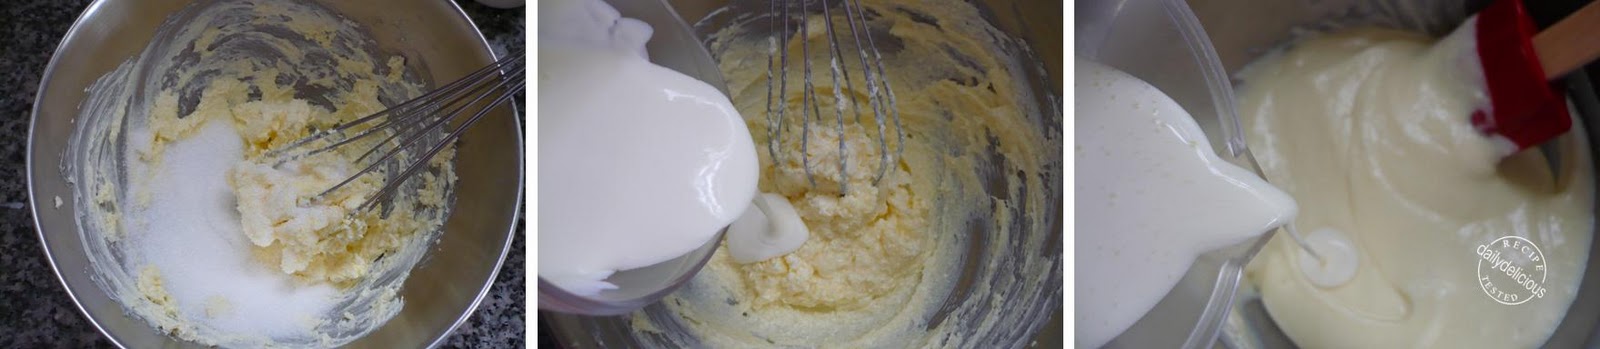
Beat the cream cheese with sugar until smooth (you can warm the cream cheese by place the bowl over the hot water to warm it, so the cheese will be smooth). Add the sour cream and whipping cream, stir to combine.


Spoon about ½ cup of the batter into a small bowl, sift the green tea over it, and stir until fully combined.


Pour the green tea mixture back into the cheese mixture, stir then add the gelatin, and stir until fully combined. Pour the batter  into a jug (or you can pour the batter directly into the prepared pan).


Pour the batter half way, then place the sweeten kidney bean over the batter, then cover with the rest of the batter, smooth the surface.
Chill for 2 hours, until firm.


Matcha Rare Cheesecake: 
A slice of Japanese taste from your kitchen! 

Wednesday, October 27, 2010

October 2010 Daring Bakers Challenge #45: Let's Go Nuts for Doughnuts! Old-Fashioned Buttermilk Cake Doughnuts with Strawberry milk glaze

Doughnut? The only thing that jump into my head is "Hot oil"  and it's the only one reason why I rarely make it, haha.  Anyway, for this month Lori of Butter Me Up (who is the host for this month challenge), want all of us to have fun with the simple (and I have to say "delicious") treats.
The doughnuts come in many forms, and many kind of the dough and batter too. And host for this month (Lori) let us make the decision, she gave a lot of recipe for doughnut: yeast doughnut, cake doughnut, pumpkin doughnuts, and raspberry jam bomboloni. We can use any type of toppings and fillings,  any shape, any size and add ingredients to the batters to make flavored doughnuts. The possibilities are endless. It's a load of things which you can create from "simple doughnut"

Anyway when it comes to me it easy, I only choose the one that I never made it before, simple cake doughnut. Most of the time I made the yeast doughnut for my family, but for the cake doughnut, I really don't know why I didn't make it, haha. My decision is right, anyone in the family love this kinds of doughnut too.
I use the Old-Fashioned Buttermilk Cake Doughnuts recipe (from Nancy Silverton recipe). 
But I think that my all purpose flour has less protein than the one in the US, because I had to knead about 50g of the flour into the dough to make it manageable. So, you can use the same amount of flour as given in the recipe, then add more if the dough is very sticky. 

For the flavor, I didn't add the flavor into the dough, but using a glaze instead, the strawberry milk glaze is sweet and very fragrance ^^, anyway you can just eat the doughnut plain or sprinkle with icing sugar, it's delicious in any ways, haha.

The October 2010 Daring Bakers challenge was hosted by Lori of Butter Me Up. Lori chose to challenge DBers to make doughnuts. She used several sources for her recipes including Alton Brown, Nancy Silverton, Kate Neumann and Epicurious.


Old-Fashioned Buttermilk Cake Doughnuts 
with Strawberry milk glaze
Yield: About 15 doughnuts & 15 doughnut holes, depending on size


Preparation time: Hands on prep time - 25 minutes
Cooking time - 12 minutes 


Ingredients
Sour Cream ¼ cup / 60 ml / 60 gm / 2 oz
All Purpose Flour 3 ¼ cup / 780 ml / 455 gm / 16 oz + extra for dusting surface
(*It's too soft and very sticky,
 I have to knead 50g of the flour to the dough before cutting it)
White Granulated Sugar ¾ cup / 180 ml / 170 gm / 6 oz
Baking Soda ½ teaspoon / 2.5 ml / 3 gm / .1 oz
Baking Powder 1 teaspoon / 5 ml / 6 gm / .2 oz
Kosher (Flaked) Salt 1 teaspoon / 5 ml / 6 gm / .2 oz (If using table salt, only use ½ teaspoon)
Nutmeg, grated 1.5 teaspoon / 7.5 ml / 9 gm / .3 oz
Active Dry Yeast 1 1/8 teaspoon / 5.6 ml / 3.5 gm / .125 oz
(*I use 3/4tsp instant dry yeast)
Buttermilk ¾ cup + 2 Tablespoon / 210 ml / 225 gm / 7 ¾ oz
Egg, Large 1
Egg Yolk, Large 2
Pure Vanilla Extract 1 Tablespoon / 15 ml


Strawberry milk glaze:
Icing Sugar  200g
Frozen strawberry 36 g
Whipping cream  24g 


Directions:
1. In a small stainless-steel bowl set over a pot of gently simmering water, heat the sour cream until just warm.
2. Heat the oil to 375°F/190°C.


3. Over a large mixing bowl, sift together the flour, sugar, baking soda, baking powder, salt, nutmeg; make a large well in the center. Place the yeast in the well; pour the sour cream over it. Allow it to soften (if using packed fresh yeast), about 1 minute.


4. Pour the buttermilk, whole egg, egg yolks, and vanilla extract into the well. Using one hand, gradually draw in the dry ingredients. The mixture should be fairly smooth before you draw in more flour. Mix until it is completely incorporated. The dough will be very sticky. Wash and dry your hands and dust them with flour.


5. Sift an even layer of flour onto a work surface. Don’t be afraid to use a lot of flour. You don’t want the doughnuts sticking to your counter. Scrape dough out of bowl onto the surface; sift another layer of flour over dough. Working quickly, pat dough into an even 1/2-inch (12.5 mm) thickness. Dip cutter in flour and, cutting as closely together as possible, cut out the doughnuts and holes. Place holes and doughnuts on a floured surface. Working quickly, gather scraps of dough together, pat into 1/2-inch (12.5 mm) thickness, and cut out remaining doughnuts and holes.


6. Drop three to four doughnuts at a time into the hot oil. Once they turn golden brown, turn them and cook the other side. Cooking times may vary, but with my oil at 375 °F/190°C, I found they only took about 20 to 30 seconds per side.
7. Once cooked, place on a baking sheet covered with paper towels to drain.


Beat all the strawberry and whipping cream, add the icing sugar, mix until well combine.
Dip the doughnut into the glaze.
Let the glaze set then serve.


October 2010 Daring Bakers Challenge #45:
 Let's Go Nuts for Doughnuts! 
Old-Fashioned Buttermilk Cake Doughnuts  with Strawberry milk glaze

Monday, October 25, 2010

Coffee Meringue Cupcake: All I want to say is "Thank you"

I think this cake will be my way of saying "Thank you", ^^. Last month, I got an email from Khun Kapook (Kapook is her name and Khun is like Mr or Miss in english), she told me that she will come to Thailand and really want to see me, because she has a gift for me.
Actually, we don't know each other before, just send and reply the email, haha, but I felt good that the my blog help me find more friend. But we didn't have a chance to meet each other, -*-, well I just couldn't manage my schedule, so she told me that she will send the gift for me.


And yes, this is the book from Khun Kapook, very lovely book, ". After getting it, I want to try the recipe in the book so much anyway, it takes sometime for me, haha.
But at last I still didn't use the recipe from the book, well, I love the idea of this coffee meringue cake very much (and there are many cute cake recipes and  in the book).
But the cake recipe for this cake is a pound cake, which I think it will be too heavy for my mom (who is the best customer when I make coffee flavored cake,, hehe). So I change the cake into butter cake instead, and for the meringue, the French meringue is easy to make but it won't last long (it will lose its shape real soon after you whipped it), and it's raw. I have to change it into the Italian meringue for 1, the healthier reason (my nephew and my niece can eat it) it's safer because the meringue will be cooked with the hot sugar syrup and 2, the texture of Italian meringue is very good, and you can let it sit for a while without being worried. 
From the lovely book, here come my beautiful cupcakes, ^^. Even I didn't use the recipe from the book, the inspiration that the book gives me is priceless. So, let me use this blog as a "Thank you card" for Khun Kapook. 


Coffee Meringue Cupcake
Makes 6 standard size cupcakes


Cupcake

50g .................................. Butter
80g .................................. Sugar
1 ....................................... Egg
.......................................... A pinch of salt
60ml ................................ Half and half
100g ................................ Cake flour
1tsp .................................. Baking powder
1tsp .................................. Coffee extract 
* If you don't have the coffee extract, use 1 tsp instant coffee powder + 1tsp hot water instead.
30ml ................................ Coffee liqueur


Meringue
2 ........................................ Egg whites
100g ................................. Sugar
40g ................................... Water


Coffee extract
 Preheat the oven to 170 °C

Place the baking paper in to the cupcake tins.
Sift the flour and baking powder together.


Beat the butter, salt and sugar until light and puffy, add the coffee extract and beat to combine.
Put the egg in to the batter and beat until combine. 


Divide the flour mixture into 3, put 1/3 of the flour mixture into the batter, stir with a spatula, when combine, add half of the half and half, follow with 1/3 of the flour, stir again then add the rest of the half and half. Finish with the rest of the flour, mix to combine.


Scoop the batter into the tins.
Bake for 20 minutes, or until the cake is spring when touch lightly.
Use the bamboo stick to prick all over the cakes, then sprinkle with liqueur (about 1tsp of liqueur per 1 cup cake). 

Reduce the oven temperature to 150 °C


Make the Italian meringue:

In a sauce pan, put the sugar and water and bring to boil over medium low heat.
When the syrup reaches 100°C, start whisking the egg whites.
The syrup is ready when it reaches 117°C; pour it over the egg whites and continue whisking until stiff (you don't have to wait until it cool to use it).


Spoon the meringue on top of the cakes and spread into peaks and swirls with a palette knife. (try to cover all the top of the cake, so it won't dry out when baking) 
Put the cake bake in the oven and bake for 10-15 minutes or until the meringue turn into light brown color.
Coffee Meringue Cupcake:
 All I want to say is "Thank you"

Friday, October 22, 2010

Cherry Trifle: Cherry Cherry, you're my sweet cherry!

After I got the book ---------- I really wanted to try some recipes. It's a new book from my favorite food writer and I'm sure that the recipe will be great!. 
Luckily while browsing through the pages my sister came home with a large box of cherries, and she told me that she wanted me to turn them into a dessert ^^. I felt lucky, haha, because there is a recipe in this book that I need a lot of cherries for it. 


It's the Cherry Trifle, a cute dessert that's not hard to make. The bases of this dessert can be divided into 4 parts, first the sugared cherries, second the cake, third the syrup and the last one is whipped cream. The only thing that you will spend most of your time is the cake, the rest is only need a few minutes. 
The cake is very aromatic (after reading the recipe I believe that when he says amazing, he must talk about the vanilla fragrance, haha), it contain 3 kinds of vanilla, the vanilla powder, the extract and the vanilla bean ^^. So, you can imagine that when baking this cake the sweet smell of vanilla will fill up your kitchen and beside of the smell, the taste is quite good.   

The vanilla powder that I use is this one, it's the grounded bean that you can mix it into the dry ingredients. But if you don't have it, just skip this ingredient.
I made a bit of adjustment with the sugared cherries, because I think that a bit of tangy taste will make the dessert balance (otherwise the taste is quite flat). 


It's a great prepared ahead dessert for the party too, you can bake cake the day before, then assemble it while making other dish because the dessert will taste better if you let it rest for 2 hours before serving.
You can make a big one (9-inch) or you can make into the small individual portion like mine.

Note: I made only half of the recipe ^^, but I think it's better to post the full recipe for you all.


Cherry Trifle
Make one 9-inch layered dessert
(if making an individual dessert it depends on the size of the glass that you use)


For the sugared cherries
2 pints ........................... cherries wash and pitted (about 4 cups)
2oz. ................................ superfine sugar
1tsp ............................... apple cider vinegar
1-2tbsp ......................... lemon juice

For Amazing vanilla cake

Dry ingredients
8oz. ............................... all purpose flour
1oz. ............................... potato starch 
¼ tsp ........................... salt
1tbsp ............................ vanilla powder

Wet ingredients
4oz. ............................... unsalted butter
2tbsp ............................ rum
1tbsp ............................ vanilla extract
6 ................................... eggs, separated
12oz. ............................ superfine granulated sugar
...................................... Seed from ½ vanilla bean

For the sugar syrup
12oz. ............................. superfine granulated sugar
¾ cup ........................... water

For the whipped cream
3cups ............................ whipping or heavy cream 
2oz. ............................... superfine granulated sugar
1tsp ............................... vanilla extract

Make the sugared cherries:

To make the sugared cherries, combine the ingredients in a large bowl and toss to blend. 


Refrigerate for 2 hours, strain, and reserve the liquid.
While the cherries are chilling, make the Amazing vanilla cake.

Make the cake:
Preheat the oven to 325 °F and place the rack in the middle position. Line two 9-by-2-inch round cake pans with parchment.
Measure the dry ingredients into a bowl and whisk to blend. Set aside.


In a small saucepan over medium heat, melt the butter until it is browned, then remove from the heat. Stir in the rum and vanilla and set aside.


In the bowl of a standing mixer fitted with the wire whip attachment, beat the egg whites on high speed until fluffy, about 1 minutes. Slowly pour 2 oz. of the sugar into the whites and whip for another 20 seconds. 


In the mixer bowl, beat the egg yolks, vanilla seeds and remaining 10 oz. of sugar until the mixture is pale yellow.
Reduce the speed of the wire whip to slow, and add the dry ingredients to the mixer in three portions.
Stop the mixer and fold in the meringue with a flexible spatula, followed by the browned butter mixture.


Divide the batter between the prepared pans.
Bake for 18-20 minutes, or until the top is golden brown and wooden skewer inserted in the center comes out clean.
Cool the cakes in the pans. Use a offset spatula to release the cakes if they stick to the sides when you invert the pans.


To make the sugar syrup, combine the sugar and water in a small saucepan and bring to a simmer over medium heat, stirring occasionally, until the sugar is dissolved. Remove and let cool.

When the sugared cherries, the cake, and the sugar syrup are ready to use, wash and dry a deep glass trifle bowl.

Make the whipped cream:


To make the whipped cream, bring the ingredients to a soft peak using a standing mixer fitted with a wire whip attachment or hand beaters. Stop the mixer and whip by hand with a balloon whisk until the cream shows a slightly thick body. It should not be at all stiff.

Assemble the dessert:

Slice the cakes horizontally with serrated knife, and place one layer in the bottom of the bowl (I made an individual portion, so I cut the cake into small round; the same size of the glass) using a pastry brush or squeeze bottle, soak the layer with about one quarter of the sugar syrup and quarter of the reserved liquid from the sugared cherries.
Spoon a generous amount of whipped cream onto the first layer and level it with a ladle or spoon. Place the sugared cherries into the glass, repeat with cake and cream (if you make the big one, you will use 3 layers of cake, 2 layers of sugared cherries with whipped cream), then decorated with the sugared cherries.
Refrigerate for 2 hours before serving


Cherry Trifle:
 Cherry Cherry, you're my sweet cherry!

Printfriendly

Related Posts Plugin for WordPress, Blogger...